Showing posts with label rainbow. Show all posts

Wednesday, July 20, 2011

Ruffled Rainbow Streamers


The thing that Bailey was the most excited about regarding her birthday party wasn't the presents.  It wasn't the cake either.  It was the decorations.  She must have asked me every single day for 2 months straight if there would be balloons and streamers at the party.  The balloons didn't exactly work out (a 45 minute wait for 6 balloons at the party store...um, no thanks), but the streamers were so awesome that she didn't care about the lack of balloons.  She was thrilled with the ruffly rainbows!


When I saw this tutorial on MADE way back in May, I knew that I wanted to try making these ruffled streamers for our birthday party.


These ruffled streamers were so easy to make!  I decided to layer three colors (red, yellow, and blue).  All you do it set the tension on your sewing machine to the highest setting (9 on my machine) and sew in a straight line.  It was a little tricky in the beginning to manage three strips at once, but I got into the groove pretty quickly and managed to create a long enough ruffled streamer to decorate my entire kitchen in about 15 minutes.  Piece of cake!

(these lasted about 2 minutes before he ripped them off)

My crepe paper was really thin, and I was pleasantly surprised to find that the red, yellow, and blue streamers created a rainbow effect when layered together.  Bonus!

(the ruffled streamers in action, over in the top left corner)

The rainbow streamers were so nifty that I really wanted to keep them after the party was over, but my husband mistakenly threw them away in a fit of helpfulness.  But hey, for $3 I can make some new ones for the next party...and I didn't have to clean up the kitchen after the party, so I'm not complaining!  :)

If you like it, 
Pin It

Thursday, July 14, 2011

Somewhere Over the Rainbow

I've had so many people ask me for details about making the Rainbow Cake.  So today I'll explain a little bit more about how I made the magic happen.  Although it looks complicated, it was actually really easy!


Did I think to take pictures of the cake making process?  Of course not.  I was way too frazzled by this point in the party prep to remember to take pictures.  I'll simply explain the steps for building this awesome cake and show you the finished product, but this tutorial at Smart-Bottom Enterprises has excellent step-by-step photos of the entire process.


I started out by preparing two boxes of French Vanilla cake mix.  I used Betty Crocker, but any brand will work.  You could also use White cake mix, or any other flavor that has a whitish batter.  I should note that I added a package of Vanilla instant pudding mix and a half cup of sour cream to the cake batter, along with a tsp of vanilla extract.  I have found that this produces a nice moist cake.  Be careful not to over mix the batter since you will be mixing it even more when you add in the dye.

The next step is to evenly divide the batter into six small bowls.  It doesn't have to be exact, just eyeball it.  Now it's time to add in the dye to create the rainbow.  I used generic Target brand food coloring drops, but I have heard that Wilton gel coloring works well too.  Add dye to each of the bowls to create red, orange, yellow, green, blue, and purple batter.

My original plan was to mix the colors together in only three large 9 inch layers for a tie-dye effect.  The Rainbow Cupcakes I made a few weeks ago looked and tasted great, but when I found a set of six disposable 8 inch cake pans at the grocery store, I decided to change things up a bit and make a separate layer for each color rather than mixing the colors together.  I baked the layers two at a time at 350 degrees for 20 minutes.  After baking, I let the layers of cake cool in the pans overnight.


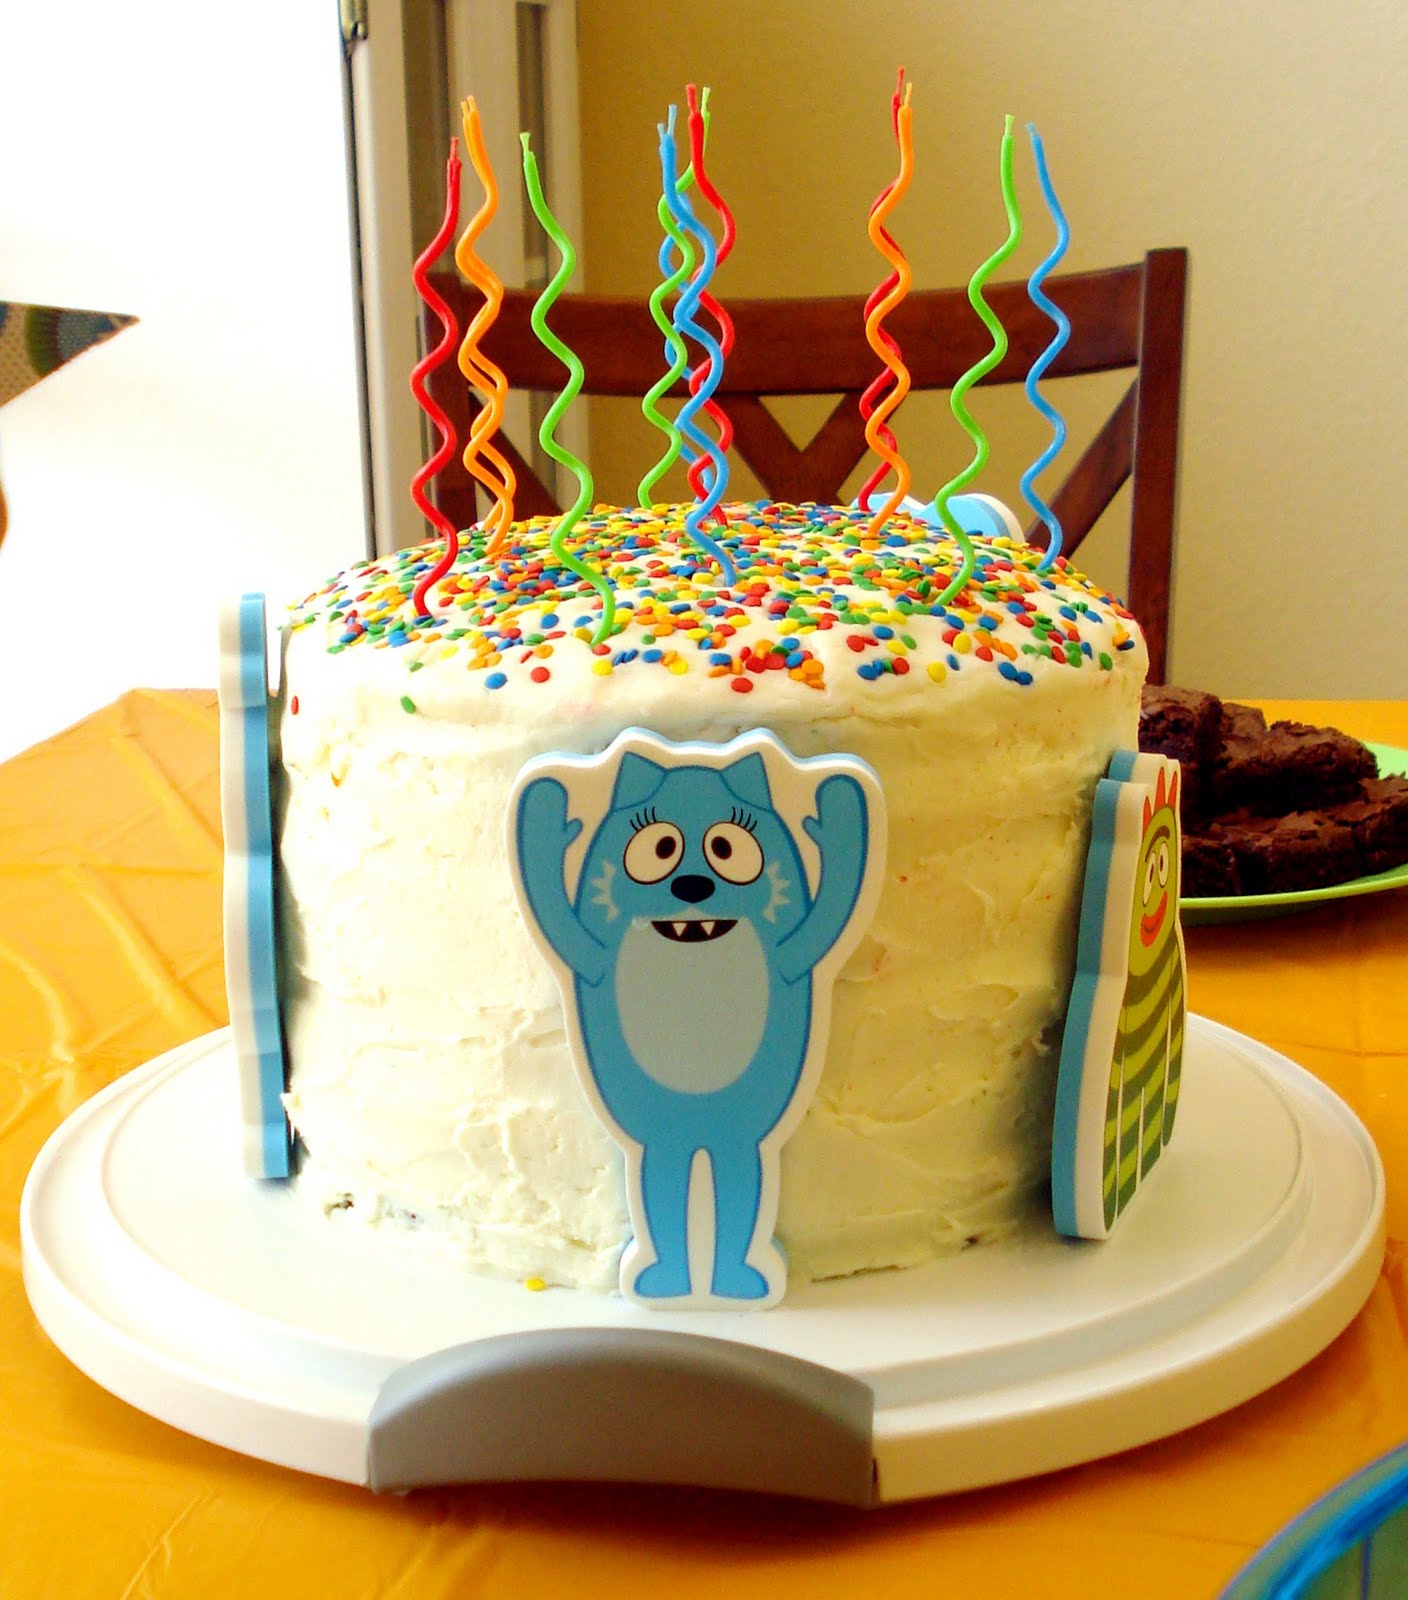
The next day I leveled each layer a bit, then stacked and frosted them using a quadruple batch of Vanilla Buttercream frosting.  I topped the cake with round Wilton sprinkles and a set of wacky, squiggly candles I found in the party aisle at Target.  The Yo Gabba Gabba characters I used to decorate the sides of the cake are actually bath toys I bought from Amazon.  I glued them to the sides of the cake using a small dab of frosting.  Voila!  A crazy cake perfect for a Yo Gabba Gabba party!


Not only did the cake look great, it also tasted great!  Everyone loved it.  It was definitely the hit of the party!


If you decide to make a Rainbow Cake of your own, I would love to hear about it and see photos...happy baking!  :)

If you like it,
Pin It

Tuesday, June 21, 2011

Taste the Rainbow


My kiddos' birthdays are only 4 days apart, so we'll be celebrating two birthdays in one for as long as I can get away with it.  This year we are celebrating the double birthday with a Yo Gabba Gabba party.  And what could be more fitting for a Yo Gabba Gabba party than a crazy rainbow cake?

Rainbow cakes are all the rage in blogland these days, but I originally saw this idea on Playing House.  This week I made a practice batch of cupcakes just to try out the technique and see exactly how colorful they would be.  I started by mixing up a Betty Crocker white cake mix, then dividing the batter into six small bowls.  Then I used Wilton gel food coloring to tint each bowl a different color of the rainbow...red, orange, yellow, green, blue, and purple.  I layered the batter into a cupcake pan filled with paper liners and baked for 15 minutes at 350 degrees.

I can honestly say that the process of layering the batter into the cupcake pan took forever and it was difficult to get the same amount of batter in each one, so I'll be sticking to cake form for the birthday party (and possible use 2 boxes of cake mix for a taller cake). And I will definitely be making my own frosting for the party cake, most likely a vanilla buttercream.  Yum!

As Muno would say...Razzle Dazzle!


How awesome is that?  This might be the most colorful birthday party ever!

Monday, May 23, 2011

The Noah's Ark Quilt

Well, it only took 7 months, but the Noah's Ark quilt is finally finished and is listed in my Etsy shop!  Hooray!


I found this colorful printed panel at my local Hancock Fabrics store back in November.  I had never quilted anything other than straight lines before, but I thought the picture was basic enough that I could manage to outline the shapes using my walking foot on my machine.


Over the next two weeks I spent every spare minute of my time quilting around every shape in the picture.  I was determined to get it finished before Christmas.  Ha!


What I thought would be a simple, quick project turned out to be anything but (this seems to happen to me quite a bit now that I think about it, hmm).  There are a lot of lines, curves, twists and turns in this picture.  Which meant a whole lot of starting and stopping, moving the quilt around for a better angle, clipping threads, etc.


Believe it or not, I did finish the actual quilting before the holiday.  The only thing between me and finishing this quilt was sewing the binding onto the back of the quilt, but for some reason it got pushed aside in favor of other projects.  This weekend, just a mere 6 months later, I decided to finally sew on the binding and call it finished.  The Noah's Ark quilt is officially marked off my to-do list.  


It was definitely a challenge, but knowing that a child will play on it, snuggle under it, and (hopefully) love it to pieces makes the blood, sweat, and tears I put into it totally worth it.

Tuesday, May 17, 2011

A Ribbon Rainbow


Rainbows are great...rainbows of ribbon are even better!  I'll reveal the results of this project in a few days.  Stay tuned!