Showing posts with label sewing. Show all posts

Thursday, October 13, 2011

The Easiest Dress You'll Ever Make


This little dress is known around the craft and sewing world as "the pillowcase dress."  Pillowcase dresses are very popular at the moment and now I know why.  This is hands down the easiest piece of clothing I've ever made and since it uses less than one yard of fabric, it's also one of the cheapest. 


I threw this one together for Bailey during one of Jake's afternoon naps using this pattern and photo tutorial at Little Big Girl Studio for reference.  Next time I'll cut the armholes just a smidge bigger.  I used a piece of orange ribbon for the tie, but I have plans to switch it out for a hot pink ribbon as soon as Halloween is over. 

Tuesday, October 11, 2011

Beach Towel Bath Robes

Before we left for our Florida vacation, I promised to give more details about the beach towel robes I made for the kiddos.  Better late than never, right? 


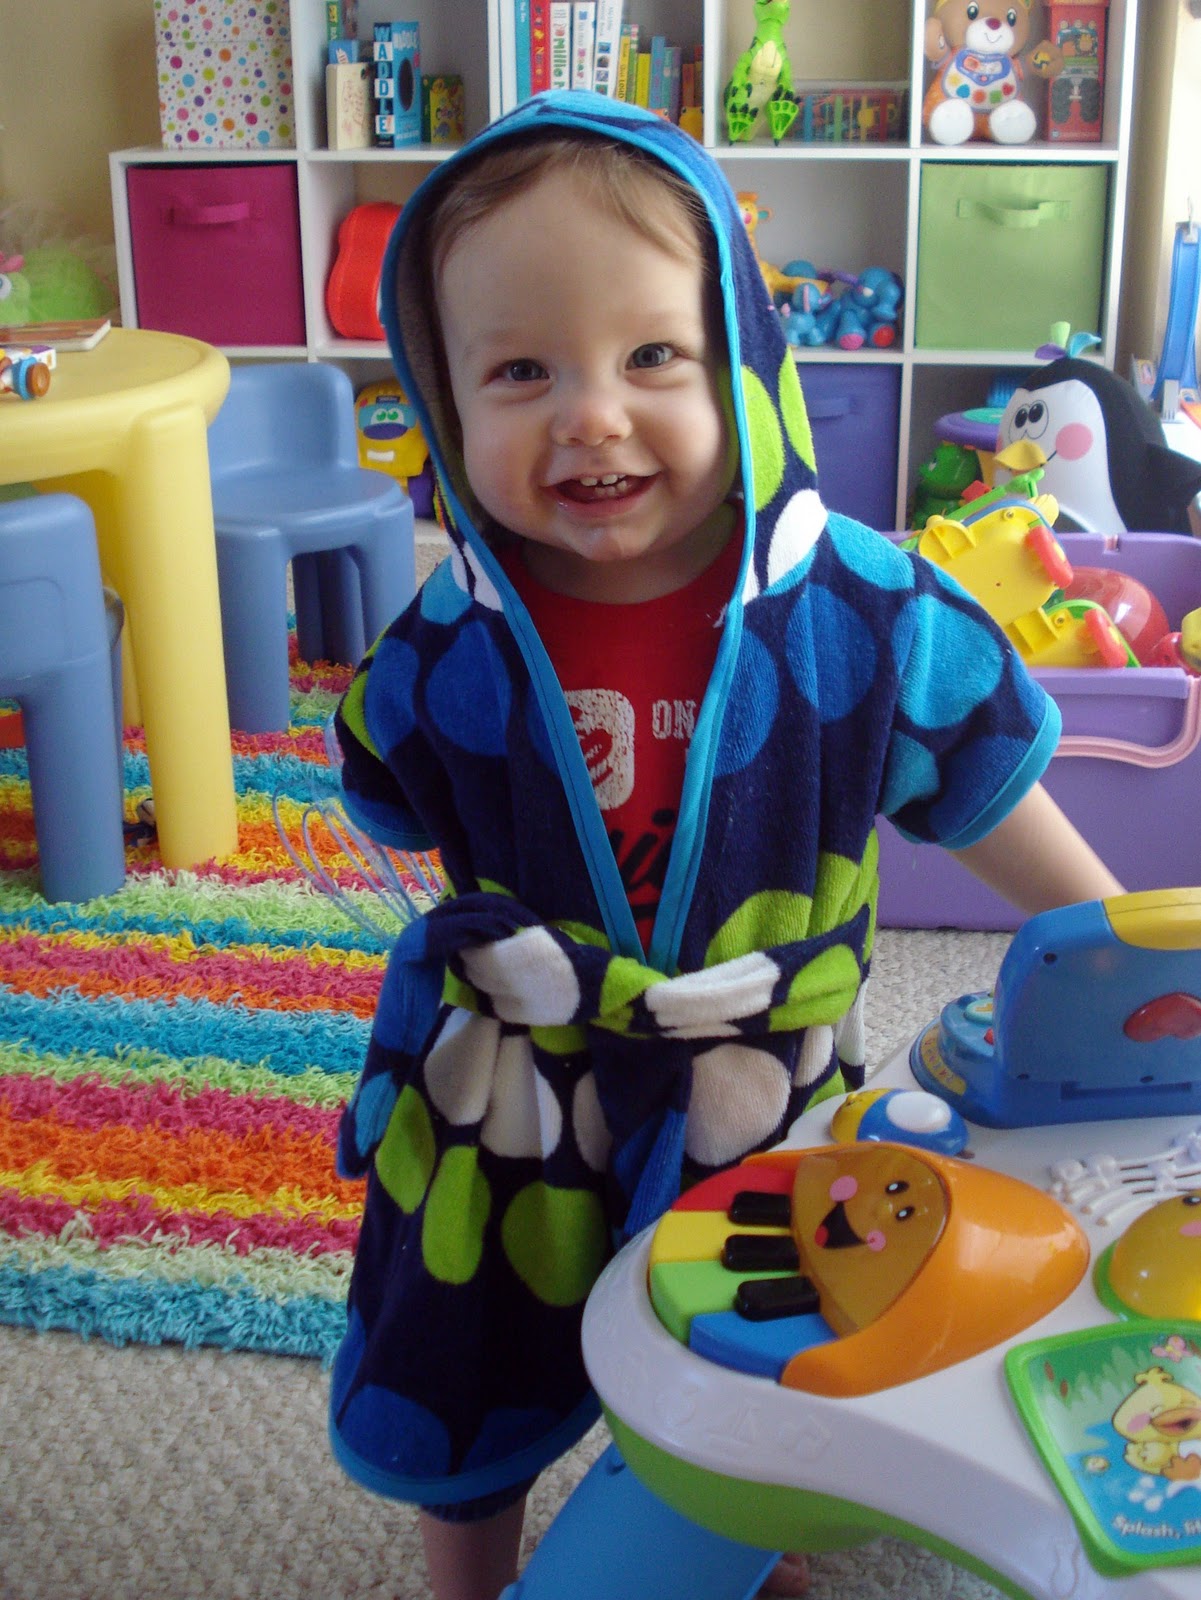
As soon as I saw this pattern for beach robes on MADE, I knew I wanted to buy it and make one for each of my kids to use after swimming.  Now that summer has passed, we still use them for drying off after bath time. 


I purchased two beach towels at Target for less than $5 each.  These thin towels were the perfect thickness to work with, not too bulky at all.  Ignore the single fold bias tape you see in the photo.  I had never used store-bought bias tape before and didn't realize until after the fact that what I really needed was extra-wide double fold tape.  Lesson learned.


I have to say, the $8 I spent on this pattern was money well spent!  The pattern comes in three sizes (9-18 month, 18 month-3T, and 3T-4T).  I made Jake's robe using the 9-18 month size, and Bailey's is 3T-4T.  The pattern includes detailed instructions and step-by-step photos for many different options...short sleeves or long sleeves, partial ties or full ties, lined hood, or no hood at all.  I chose to make my robes with short sleeves, unlined hoods, and partial ties (meaning they are sewn into the sides of the robe instead of wrapping all the way around through loops like a belt).  My towels were large enough that I only needed to use one towel for each robe, but I barely squeaked by on Bailey's.  Had I decided to go with long sleeves or the full tie, I definitely would have needed a second towel.  This is such an easy, versatile, and affordable pattern...I would recommend it to anyone! 


My kids love their bath robes!  I'm thinking of using a version of this pattern (no hood and long sleeves) to make some snuggly fleece robes for the wintertime, maybe as Christmas gifts.  I will be keeping an eye out for more great patterns from MADE!

Thursday, October 6, 2011

T-shirt Refashion


One day while strolling through the kids' clothing section at Target I saw this dress...


This adorable little sweater dress cost $15.  Not a fortune, but more than I wanted to spend at the time.  Besides, the dress is so simple that my first thought was "I bet I could make that."

Later that day I had a brief flash of brilliance.  I found this t-shirt hanging in my closet...


It was light brown and had a similar gathering along the neckline as the little sweater dress.  The idea was that I could refashion it into a dress for Bailey that would look pretty darn close to the sweater dress in Target.  I hadn't worn the shirt in a good while, so I was willing to sacrifice it for the sake of preschool fashion.


My plan was to keep the original neckline, hemline, and sleeves so those parts would look "finished."  Using one of Bailey's summer dresses as a guide, I cut the t-shirt up each side the entire length of the shirt, removing the sleeves.  I carefully trimmed the excess material from each sleeve and set them aside to use later.  Then I adjusted the neckline and length of the dress by sewing a new shoulder seam.  I reattached the sleeves, then sewed down each side of the dress and it was finished!


It's not exactly the same as the sweater dress from Target, but it's still cute.  And it was free...bonus!  I experimented with putting elastic in the sleeves, but then decided against it.  The pink flower is actually a hair clip that I just clipped on for the photo.  I need to make a pink fabric flower pin using this tutorial so the flower can be removed before washing.


Someone with more experience sewing clothing probably could have finished this in a half hour.  It took me nearly all day...yet another reason why I wouldn't last a day on Project Runway.  Sewing clothes (especially those made of stretchy t-shirt material) is so much harder than sewing quilts!  All in all I am pretty satisfied with it, although next time I will probably just buy the Target dress.  My little supermodel loves it, so that makes me happy!  :)

Wednesday, September 21, 2011

10 Down, 10 More to Go


My little guy developed a sinus infection last week and as a result, his naps were short and sporadic.  He only wanted one thing all week...attention from Mama.  So I didn't finish the entire quilt top like I had hoped, but I did complete 10 blocks.  Now I only need to make 10 more to have enough for a nice sized lap quilt.  I think it's coming along quite nicely.  I'm still trying to decide whether to add 2 1/2" white sashing between the blocks.  I'm leaning toward yes...any thoughts or suggestions? 

Wednesday, September 14, 2011

Work in Progress Wednesday

My daughter started back to preschool last week, and even though my (now walking/running/climbing) son is a handful and a half, I still manage to squeeze in a few minutes of sewing every day during his naptime.  My to-do list is about ten miles long.  It reminds me of a scene from an old cartoon where a little kid is reading to Santa from his little wish list, and just when Santa thinks he's finished the rest of the paper unrolls and you see that the list is reeeeally long.  Yep, it's like that.  It's time to kick the sewing machine into over drive.

At the moment I'm working on turning this set of strips...


into this...


The 2 1/2" strips are from a jellyroll that I bought at JoAnn's.  Cutting fabric is my least favorite part of the quilting process, so I love buying pre-cut sets of fabric like charm packs, fat quarter bundles, and jellyrolls.  Plus, I am very indecisive and spend way too much time trying to figure out which fabrics look best together, so it's an added bonus that the fabric are already coordinated for me.  I'm sure this particular block has a name, but I have no idea what it is.  I'm just making it up as I go along, trying to make the most efficient use of my jellyroll fabric.  The end product will be a quilt for a family friend who has been recently diagnosed with cancer.  Hopefully I can crank out all of the blocks this week and share a picture of the completed quilt top next week.

Have a great week!

Friday, August 12, 2011

Mission Accomplished

Thanks to a little wisdom and guidance from the sewing fairy (also known as Nana), all three projects from last week are officially marked off my to-do list.  Booyah!

Wow Wow Wubbzy Travel Pillow...


(note to self - scrub the crayon marks off of the kids' table)

Refashioning inexpensive jersey knit dresses into swimsuit cover-ups for myself...


Beach robes for the kiddos (more details to come)...


Now it's time for some fun in the sun.  Bring on the beach!

Wednesday, August 3, 2011

The Final Countdown

In 12 days, my husband and I are packing up the kids and driving 12 hours to beautiful, sunny Destin, Florida.  Before this Griswoldesque family beach vacation can get underway, I have a few last minute projects to finish up.  Can you still technically call something a work in progress if the only thing you've accomplished is buying the fabric?

On my to-do list...


First up is a Wow Wow Wubbzy travel pillow for Bailey.  On Sunday, Bailey and I spent a little quality mommy/daughter time together.  We visited a paint your own pottery place, cooled off with some smoothies from Jamba Juice (I highly recommend the Green Tea Blast...yum!), and stopped by Hancock Fabrics.  I told her she could pick any fabric in the store for a travel pillow and she immediately zeroed in on this Wow Wow Wubbzy fabric.  I bought a half yard each of two different prints.  It should be more than enough for a small travel pillow and maybe even a few crayon rolls.  Well done Bailey.

Those polka dot towels (snagged a few weeks ago for only $4 each from Target...score!) are waiting patiently to become beach robes.  I bought the towels, the bias tape, and the pattern, and now I'm just waiting for the sewing fairy to come make them for me. 


And last but not least, a little something for myself.  I bought these jersey knit dresses for $8.99 each at Ross.  They are lightweight and make great swimsuit cover-ups.  The only problem is that they were both way too long so I was constantly tripping, and neither dress had straps, so I always felt like they were falling down.  So I used my handy dandy rotary cutter to chop off them both off right at the knee.  I don't think the jersey knit will unravel, so I'll most likely leave the bottom edge raw.  Then I cut the excess fabric into strips, braided it, and attached the braided pieces as straps.  The grey dress is finished, but the purple one still needs straps.  This was one of the easiest clothing refashions I've ever done.  Ok, to be totally honest it's the only (successful) one I've ever done, but who's counting? 

So I'm hoping that tonight I'll at least finish sewing the straps onto the purple dress so I can mark it off the list.  And if that happens while watching cheesy reality tv (perhaps Masterchef?) I won't complain.  :)

Wednesday, July 20, 2011

Ruffled Rainbow Streamers


The thing that Bailey was the most excited about regarding her birthday party wasn't the presents.  It wasn't the cake either.  It was the decorations.  She must have asked me every single day for 2 months straight if there would be balloons and streamers at the party.  The balloons didn't exactly work out (a 45 minute wait for 6 balloons at the party store...um, no thanks), but the streamers were so awesome that she didn't care about the lack of balloons.  She was thrilled with the ruffly rainbows!


When I saw this tutorial on MADE way back in May, I knew that I wanted to try making these ruffled streamers for our birthday party.


These ruffled streamers were so easy to make!  I decided to layer three colors (red, yellow, and blue).  All you do it set the tension on your sewing machine to the highest setting (9 on my machine) and sew in a straight line.  It was a little tricky in the beginning to manage three strips at once, but I got into the groove pretty quickly and managed to create a long enough ruffled streamer to decorate my entire kitchen in about 15 minutes.  Piece of cake!

(these lasted about 2 minutes before he ripped them off)

My crepe paper was really thin, and I was pleasantly surprised to find that the red, yellow, and blue streamers created a rainbow effect when layered together.  Bonus!

(the ruffled streamers in action, over in the top left corner)

The rainbow streamers were so nifty that I really wanted to keep them after the party was over, but my husband mistakenly threw them away in a fit of helpfulness.  But hey, for $3 I can make some new ones for the next party...and I didn't have to clean up the kitchen after the party, so I'm not complaining!  :)

If you like it, 
Pin It

Monday, July 18, 2011

Muno! He's Tall and Friendly


There was a time not too long ago, when I had no idea who Muno, Brobee, Toodee, Foofa, Plex, and DJ Lance were.  Yo Gabba Gabba was just a crazy kids' show that Joel McHale made fun of on The Soup.  Even after my daughter was born, I was still clueless.  But then one day while strolling through the toy aisle at Target, it happened...


And so it began!  By the time she was three, Bailey had completely fallen head over heels for Yo Gabba Gabba.  As silly and weird as this show seems to adults, it really does teach a number of valuable lessons...always buckle up in the car, try new foods, don't say mean things to friends, and most importantly, don't bite your friends.


For Bailey's third birthday, I made her a set of Yo Gabba Gabba felt puppets...


This year's Yo Gabba Gabba birthday theme was an easy choice.  I wanted to continue the tradition of giving at least one handmade gift, but I had no idea what to make.  Then a few months ago, while on a routine (and by that I mean I feel compelled to go at least once a week) trip to Hancock Fabrics, I found a huge piece of red dot minky fabric hidden at the bottom of a big pile of remnants.  As soon as I saw it, a lightbulb went off....Muno!  He's the tall red cyclops with bumpy skin.  His shape seemed easy enough for even me to pull off.


Fast forward to 10:00pm the night before the birthday party.  My pattern making skills leave quite a bit to be desired and I was running short on time, so my Muno doll eventually transformed into a Muno pillow.  I used some scraps of black and white fleece for the eye and mouth.  In about 30 minutes, I had a soft and cuddly handmade gift.  He's the perfect companion for Bailey's Brobee pillow (purchased at Target in the kids bedding section).  Not exactly what I had in mind originally, but Jake and Bailey both love it, so I consider this a crafting success.  :)


Wednesday, June 22, 2011

Machine Stitched Binding

To be completely honest, sewing the binding onto a quilt by hand is not my favorite part of the quilting process.  I love the look of hand sewn binding on a quilt, but it has become a chore I dread.  It can be tedious and time consuming, and let's face it, with a 3 year old and a 11 month old running around I don't have a lot of down time to sew anything by hand these days.  Once I get started it's not so bad, but I will put off a project for months to avoid doing it.  (cough, cough...for instance Jake's baby quilt or perhaps the Noah's Ark quilt...cough, cough)


But then I discovered this tutorial on one of my favorite quilting blogs, Red Pepper Quilts.  Step by step instructions, complete with pictures, showing me how to stitch the binding with my machine.  Where have you been all my life??

First I tried it on a tiny baby quilt.  It started out a little rocky, but with a little bit of practice, I finally got the hang of it.

So then I gave it a whirl on the Noah's Ark quilt...


Success!
 

Never again will I let a project go unfinished simply because of the dreaded binding!