

Monday, July 4, 2011
Friday, July 1, 2011
Let's Go Picniking!
Have you heard of Picnik? It's a fantastic website that lets you edit your photos for free. I stumbled across it last fall and since then every photo I post receives the Picnik treatment.
For example, in my last post I showed you my new favorite photo of my kiddos. That photo actually started out as a bit of a mess, but with a bit of cropping and the addition of a few cool effects, my photo went from just another crazy photo to one of my absolute favorites...

This example shows one of my favorite effects in action, Cross-Processing...

A few more examples of photos I've "Picniked"...
Nearly every photo I snap takes a trip through Picnik before being posted. I love that Picnik lets me remove red eyes, straighten photos, boost colors, add text to my pictures, and even create collages. But Picnik's usefulness isn't limited to just photos. I worked my Picnik magic to create my header and avatar for my Etsy shop and I used a combination of text, stickers, and frames to create packaging for my hairbows...

I even used Picnik to create my Christmas card and the invitation for my kids' upcoming birthday party...


While Picnik does offer a premium package with tons of effects, fonts, stickers, and extra photo storage for a fee, I've found that the free effects and fonts meet my needs perfectly. If you haven't tried Picnik, you should definitely check it out. You'll be amazed at what it can do to give your photos a little extra oomph! It's just plain fun!

I have not been paid by Picnik for this review. I just love it and wanted to share it's awesomeness with you!
For example, in my last post I showed you my new favorite photo of my kiddos. That photo actually started out as a bit of a mess, but with a bit of cropping and the addition of a few cool effects, my photo went from just another crazy photo to one of my absolute favorites...

This example shows one of my favorite effects in action, Cross-Processing...

A few more examples of photos I've "Picniked"...

Nearly every photo I snap takes a trip through Picnik before being posted. I love that Picnik lets me remove red eyes, straighten photos, boost colors, add text to my pictures, and even create collages. But Picnik's usefulness isn't limited to just photos. I worked my Picnik magic to create my header and avatar for my Etsy shop and I used a combination of text, stickers, and frames to create packaging for my hairbows...

I even used Picnik to create my Christmas card and the invitation for my kids' upcoming birthday party...


While Picnik does offer a premium package with tons of effects, fonts, stickers, and extra photo storage for a fee, I've found that the free effects and fonts meet my needs perfectly. If you haven't tried Picnik, you should definitely check it out. You'll be amazed at what it can do to give your photos a little extra oomph! It's just plain fun!

I have not been paid by Picnik for this review. I just love it and wanted to share it's awesomeness with you!
Wednesday, June 29, 2011
Cute Overload
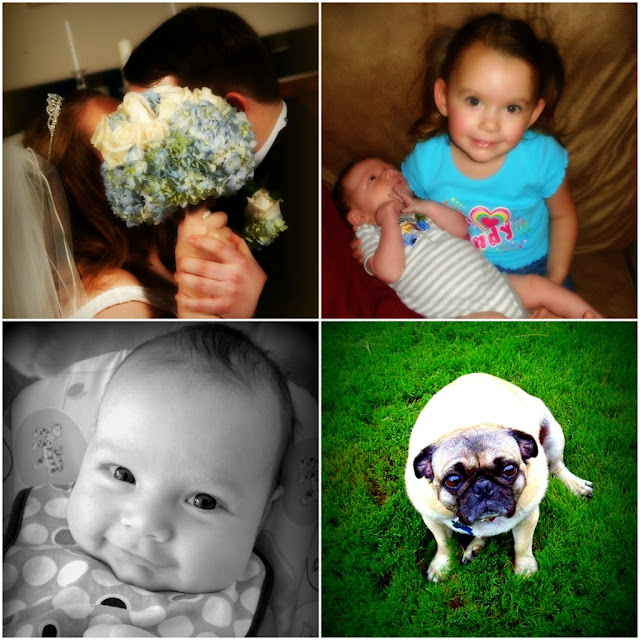
This is my new favorite photo of my little knuckleheads...

Adorable, isn't it? I think they take after their mommy. ;-)

Adorable, isn't it? I think they take after their mommy. ;-)
Monday, June 27, 2011
Progress...

I am still knee deep in free motion quilting "the biggest quilt I've ever made," but I can see the finish line. The quilting is about 80% finished...roughly one nap time's worth left to go if my son cooperates. The next step will be figuring out what to do for the binding. Since both the border and backing are solid, I'm considering making a scrappy binding using the leftover scraps from the blocks in the top. I think a scrappy binding would stand out more and make the edge of the quilt more interesting. Hopefully the next update will be to show off the finished quilt!
Friday, June 24, 2011
Ricki Recommends...
Instead of featuring posts that caught my eye from blogland this week, I decided to share of few of my current favorite things a la Oprah...
For my face...

Garnier Moisture Rescue Refreshing Gel-Creme - this gel facial moisturizer is so light, cool, and refreshing...perfect for summer!
For my nails...

The Texas Collection's Houston We Have a Purple by OPI - I will admit that I am not the girliest girl you'll ever meet, but I do love a great pedicure and this glossy pink/purple jelly polish is my new favorite for my toes. A big thanks to my friend Melissa for sending it my way!
For my lips...

Dr. Pepper Lip Smacker - Dr. Pepper is the state beverage of Texas (if not, then it should be!) I carry this with me everywhere I go. Juvenile? Perhaps, but I love it! If Bonne Bell ever starts making Sweet Tea Lip Smacker, this southern girl will be in heaven!
For my hips...

Yogurtland - My entire family is obsessed with Yogurtland's self-serve fro-yo and it's tempting toppings. I'm a fan of the Toasted Coconut and Kona Coffee flavors. My husband goes back and forth between the Cinnamon Graham Cracker and Red Velvet Cupcake Batter flavors. My daughter Bailey is dedicated to a combination of Strawberry, Chocolate, and Nilla Wafer with a cherry on top. We need a 12 step program for our fro-yo addiction.
*I have not been paid to review these products...they are simply of few of my favorite things that I wanted to share with you.
Have a great weekend!
**Ricki's Favorite Thiiiiiiiiiings!**
For my face...
Garnier Moisture Rescue Refreshing Gel-Creme - this gel facial moisturizer is so light, cool, and refreshing...perfect for summer!
For my nails...
The Texas Collection's Houston We Have a Purple by OPI - I will admit that I am not the girliest girl you'll ever meet, but I do love a great pedicure and this glossy pink/purple jelly polish is my new favorite for my toes. A big thanks to my friend Melissa for sending it my way!
For my lips...
Dr. Pepper Lip Smacker - Dr. Pepper is the state beverage of Texas (if not, then it should be!) I carry this with me everywhere I go. Juvenile? Perhaps, but I love it! If Bonne Bell ever starts making Sweet Tea Lip Smacker, this southern girl will be in heaven!
For my hips...
Yogurtland - My entire family is obsessed with Yogurtland's self-serve fro-yo and it's tempting toppings. I'm a fan of the Toasted Coconut and Kona Coffee flavors. My husband goes back and forth between the Cinnamon Graham Cracker and Red Velvet Cupcake Batter flavors. My daughter Bailey is dedicated to a combination of Strawberry, Chocolate, and Nilla Wafer with a cherry on top. We need a 12 step program for our fro-yo addiction.
*I have not been paid to review these products...they are simply of few of my favorite things that I wanted to share with you.
Have a great weekend!
Wednesday, June 22, 2011
Machine Stitched Binding
To be completely honest, sewing the binding onto a quilt by hand is not my favorite part of the quilting process. I love the look of hand sewn binding on a quilt, but it has become a chore I dread. It can be tedious and time consuming, and let's face it, with a 3 year old and a 11 month old running around I don't have a lot of down time to sew anything by hand these days. Once I get started it's not so bad, but I will put off a project for months to avoid doing it. (cough, cough...for instance Jake's baby quilt or perhaps the Noah's Ark quilt...cough, cough)

But then I discovered this tutorial on one of my favorite quilting blogs, Red Pepper Quilts. Step by step instructions, complete with pictures, showing me how to stitch the binding with my machine. Where have you been all my life??
First I tried it on a tiny baby quilt. It started out a little rocky, but with a little bit of practice, I finally got the hang of it.
So then I gave it a whirl on the Noah's Ark quilt...


Success!

Never again will I let a project go unfinished simply because of the dreaded binding!

Tuesday, June 21, 2011
Taste the Rainbow

My kiddos' birthdays are only 4 days apart, so we'll be celebrating two birthdays in one for as long as I can get away with it. This year we are celebrating the double birthday with a Yo Gabba Gabba party. And what could be more fitting for a Yo Gabba Gabba party than a crazy rainbow cake?
Rainbow cakes are all the rage in blogland these days, but I originally saw this idea on Playing House. This week I made a practice batch of cupcakes just to try out the technique and see exactly how colorful they would be. I started by mixing up a Betty Crocker white cake mix, then dividing the batter into six small bowls. Then I used Wilton gel food coloring to tint each bowl a different color of the rainbow...red, orange, yellow, green, blue, and purple. I layered the batter into a cupcake pan filled with paper liners and baked for 15 minutes at 350 degrees.
I can honestly say that the process of layering the batter into the cupcake pan took forever and it was difficult to get the same amount of batter in each one, so I'll be sticking to cake form for the birthday party (and possible use 2 boxes of cake mix for a taller cake). And I will definitely be making my own frosting for the party cake, most likely a vanilla buttercream. Yum!
As Muno would say...Razzle Dazzle!

How awesome is that? This might be the most colorful birthday party ever!
Subscribe to:
Posts (Atom)